The Evolution of a Stunning DIY Kitchen Remodel: Before and After
From 90s drab to modern & minimal.

Don’t be fooled by glitzy home improvement shows that reveal a whole new room in three days. For most of us, the process takes a lot longer. Renovating a room like the kitchen takes time and a substantial financial investment. Mary from Our Kin & Home and her husband started making improvements to the kitchen when they bought their home in 2018. But this kitchen remodel before and after paints a realistic picture of how tastes and homes evolve over time. Here’s what she learned along the way!
BEFORE
AFTER

“Our home is a 2006 builder-grade house, so it’s not our dream home by any means, but it’s our first/starter home and we saw the potential to create the character it lacked,” says Mary. “Over the years we’ve faced challenges, run into issues, and we’ve gone over budget — but this kitchen has been such an amazing win for us.”
 The between stage of kitchen remodel beofre and after, before the space was upgraded with even more DIYs.
The first change they made was ripping down the upper cabinets, which made the whole room feel more open and airy. They also gave the bottom cabinets a quick paint job. To ensure that they didn’t lose storage, they added custom shelving and converted the oddly-shaped peninsula counter area that divided the kitchen and dining room into a center island. Finally, to complete the quickie fix up, they topped off the cabinets with butcher-block countertops.
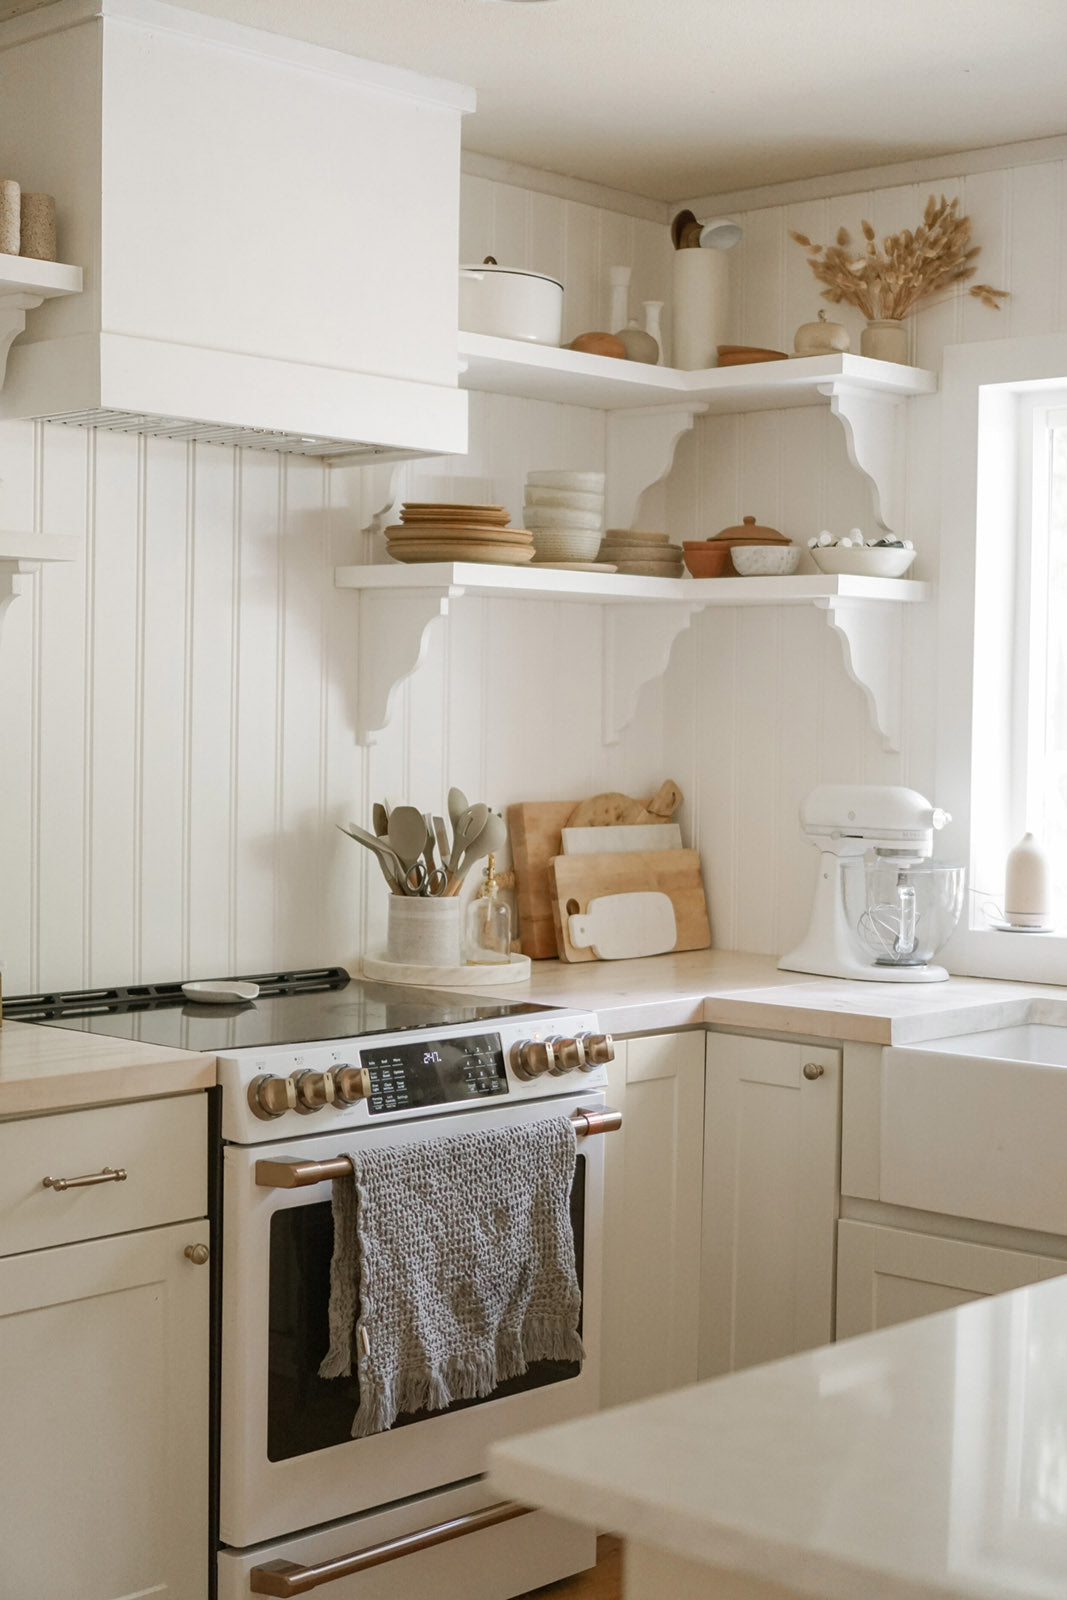 But after a while the low budget updates started to show wear; the lower cabinets warped and the initial paint job was chipping off. So the couple decided to make more of an investment in the room. The first step was buying new cabinets — a step up from builder grade but not custom — that allowed for better quality and still fit their budget. And here’s a quick money-saving trick: they had them delivered to the store to avoid paying for at-home delivery.
 Instead of going with new counters, they pulled off the existing butcher block and sanded down the discoloration and water damage (they never sealed the counters the first time around). Then they added a white wash stain and finished it with a water-based poly (oil-based yellows over time). “We chose to do a wide bead-board wall paneling for the backsplash instead of tile because it was more cost effective. I loved the character it gave and it was so much easier to install than tile,” says Mary. “The walls were pretty beat up and really ugly so it was an easy way to cover up the holes and yuck from previous owners.”
 From there it was all about choosing the new paint color for the cabinets. “Originally I thought I was going to use Turbinado, but it didn’t pair well with the new color of the butcher block counters,” she says. “Thankfully I ordered a couple of other beige colors and we ended up using No Filter for our lower kitchen cabinets in the trim and semi-gloss finish. Since it’s such a high traffic spot, especially with sticky little fingers and where spills happen so often, it’s just a whole lot easier to clean!”
 A stunning DIY kitchen remodel, done entirely by themselves (with a little help from her father-in-law), this new space feels bespoke and charming — and about as far from builder-grade as possible. “Overall, we’re really thrilled with our hard work from beginning to end,” says Mary. “We went the more difficult route, but we’ve learned so much and although we’re going slow and steady, we’re doing it!”
Related: Eager to see more kitchen remodel before and after ideas? Read Think pink: step inside this unexpected kitchen makeover.
Ready to Get Rolling?
Tags:
We make paint shopping simple with curated colors, zero VOC paint and everything you need to create a home you love, delivered.